A Night at the Icefall

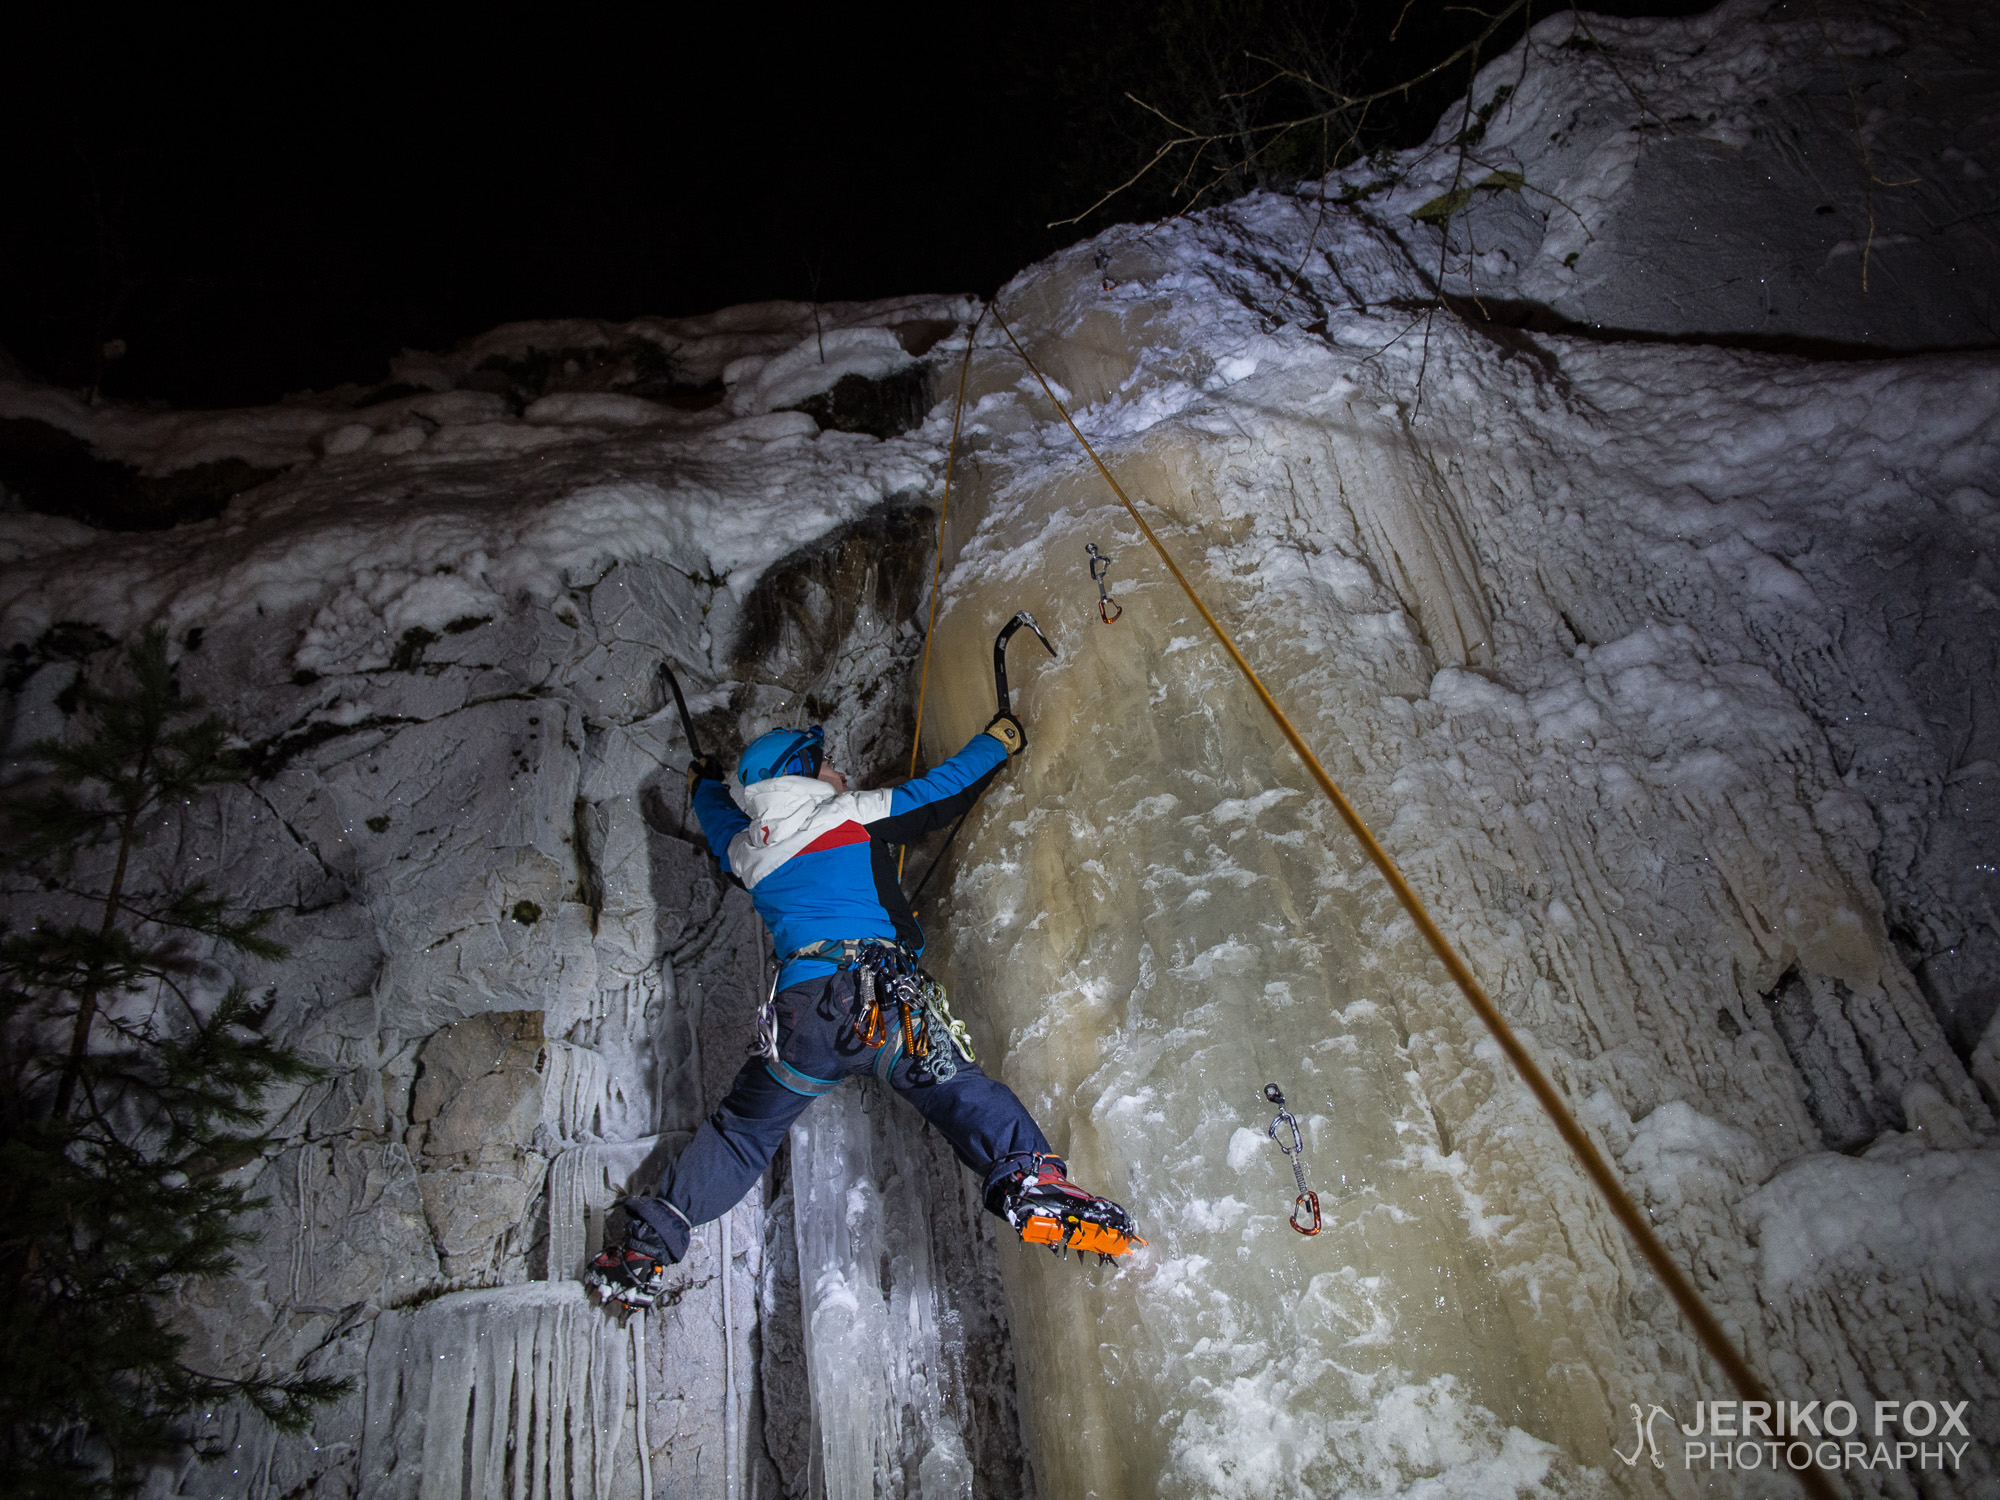
Me and Dima had been planning for a nocturnal ice climbing trip for a while. Dima, being the crazy inventor he is, had built a carry-on lightning set and we were willing to give it a test run. In Finland darkness falls early in winter and that means the daylight hours are few. Thus the lightning set could be useful even at the daytime, while living close to the arctic circle.

We headed for the Haminalahti icefall, since it is close to a road and the lightning set was quite heavy thing to carry around, to say the truth. In addition we took selection of cameras to be able to record our nocturnal project.

Since we had the whole night to climb, we had enough time to do some lead climbing and top roping as well. We were also simulating how to climb very delicate thin ice, trying to get up with as few ice tool swings and crampon kicks as possible. You can get more out of the same old icefall when you climb it different ways.

I noticed that next to our icefall there was actually a quite interesting rock features that offered good placements for ice tools. That’s how I got an idea to have my very first try of a mixed climb. Mixed climbing means climbing with ice climbing gear a route that is partly rock and partly covered by ice (different from drytooling that means climbing only on rock). My first try was to climb rock on my left side and ice on my right side. When this seemed to go nicely, I decided to climb the rock only (so, basically drytooling). While climbing mixed, you need to know when you are reaching for ice and when rock. Because for obvious reasons you don’t want to swing your ice tool or kick your crampon to rock. All moves on rock needs to be done by placing the gear nicely and carefully. Of course this is not a difficult thing to understand, but when you are used to hammer the ice with your tools that movement pattern must be reimagined.

We were climbing until the early morning and the battery in our lightning set showed no signs of running out. I edited two videos from the clips that we shot during the night. One is a compilation of the whole night and another is a two camera view of me climbing a mixed route.

Location: 62°50’58.8″ N, 27°32’11.4″ E

Olimme suunnitelleet jo jonkin aikaa Diman kanssa yökiipeilyä jääputouksella. Dima oli nimittäin rakentanut mukana kannettavat valonheittimet ja halusimme testata niitä tositoimissa. Suomessa pimeä tulee talvella aikaisin ja valoisa aika jääkiipeilyyn – etenkin työpäivän päätteeksi – on harmillisen vähäinen. Valonheittimistä olisi siis iloa myös muuhun kuin yökiipeilyyn näillä leveysasteilla.

Otimme kohteeksi Haminalahden jääputouksen, koska se on lähellä tietä ja valonheitinlaukku akkuineen ei ollut aivan kevyt kannettava. Lisäksi raahasimme mukanamme pienen arsenaalin kuvauskalustoa saadaksemme yöprojektista todistusaineistoa niin valokuvina kuin videoina.

Yön aikana ehdimme sekä liidata että kiivetä yläköydellä. Simuloimme myös ohuen jään kiipeämistä nousemalla putousta mahdollisimman vähin hakuniskuin ja jäärautojen potkuin – toisinsanoen hyödyntäen jäässä olemassa olevia koloja mahdollisimman paljon. Samasta jääputouksesta saa enemmän irti, kun sitä kiipeää eri tavoilla.

Huomasin jääputouksen vieressä olevan kallion tarjoavan myös hyviä paikkoja jäähakuille, joten päätin kokeilla ensimmäistä kertaa elämässäni mixtaa. Mixtakiipeilyssä kiivetään siis jääkiipeilyvälineitä käyttäen reittiä, joka muodostuu osittain kalliosta ja osittain jäästä (erotuksena drytoolauksesta, jossa kiivetään pelkkää kalliota hakkujen avulla). Ensimmäisellä kerralla kiipesin vasemman puolen raajoilla kalliota ja oikean puolen raajoilla jäätä. Tämän onnistuttua ongelmitta kiipesin seuraavaksi pelkästään kalliota (käytännössä siis drytoolaamalla) pitkin. Mixtaa kiivetessään pitää olla tietoinen milloin mikäkin raaja liikkuu kalliolla ja milloin jäällä. Ensinmainittuun ei nimittäin kannata ilmiselvistä syistä lyödä hakuilla tai potkia raudoilla vaan muuvit tehdään asettelemalla välineet kalliolle. Tämä ei ole tietenkään vaikea asia ymmärtää, mutta totuttuaan käyttämään hakkuja ja rautoja toisella tavalla täytyy hieman varoa kiivetessään selkäytimestä tulevaa liikemallia.

Kiipeilimme aikaiseen aamuun asti ja valonheittimien akku riitti täysin ongelmitta. Leikkasin yön aikana kuvatuista videoista yleiskoosteen sekä kahdella kameralla kuvatun videon yhdestä mixta-vedostani (videot alussa).

Sijainti: 62°50’58.8″ N, 27°32’11.4″ E

Haminalahti Ice Climbing

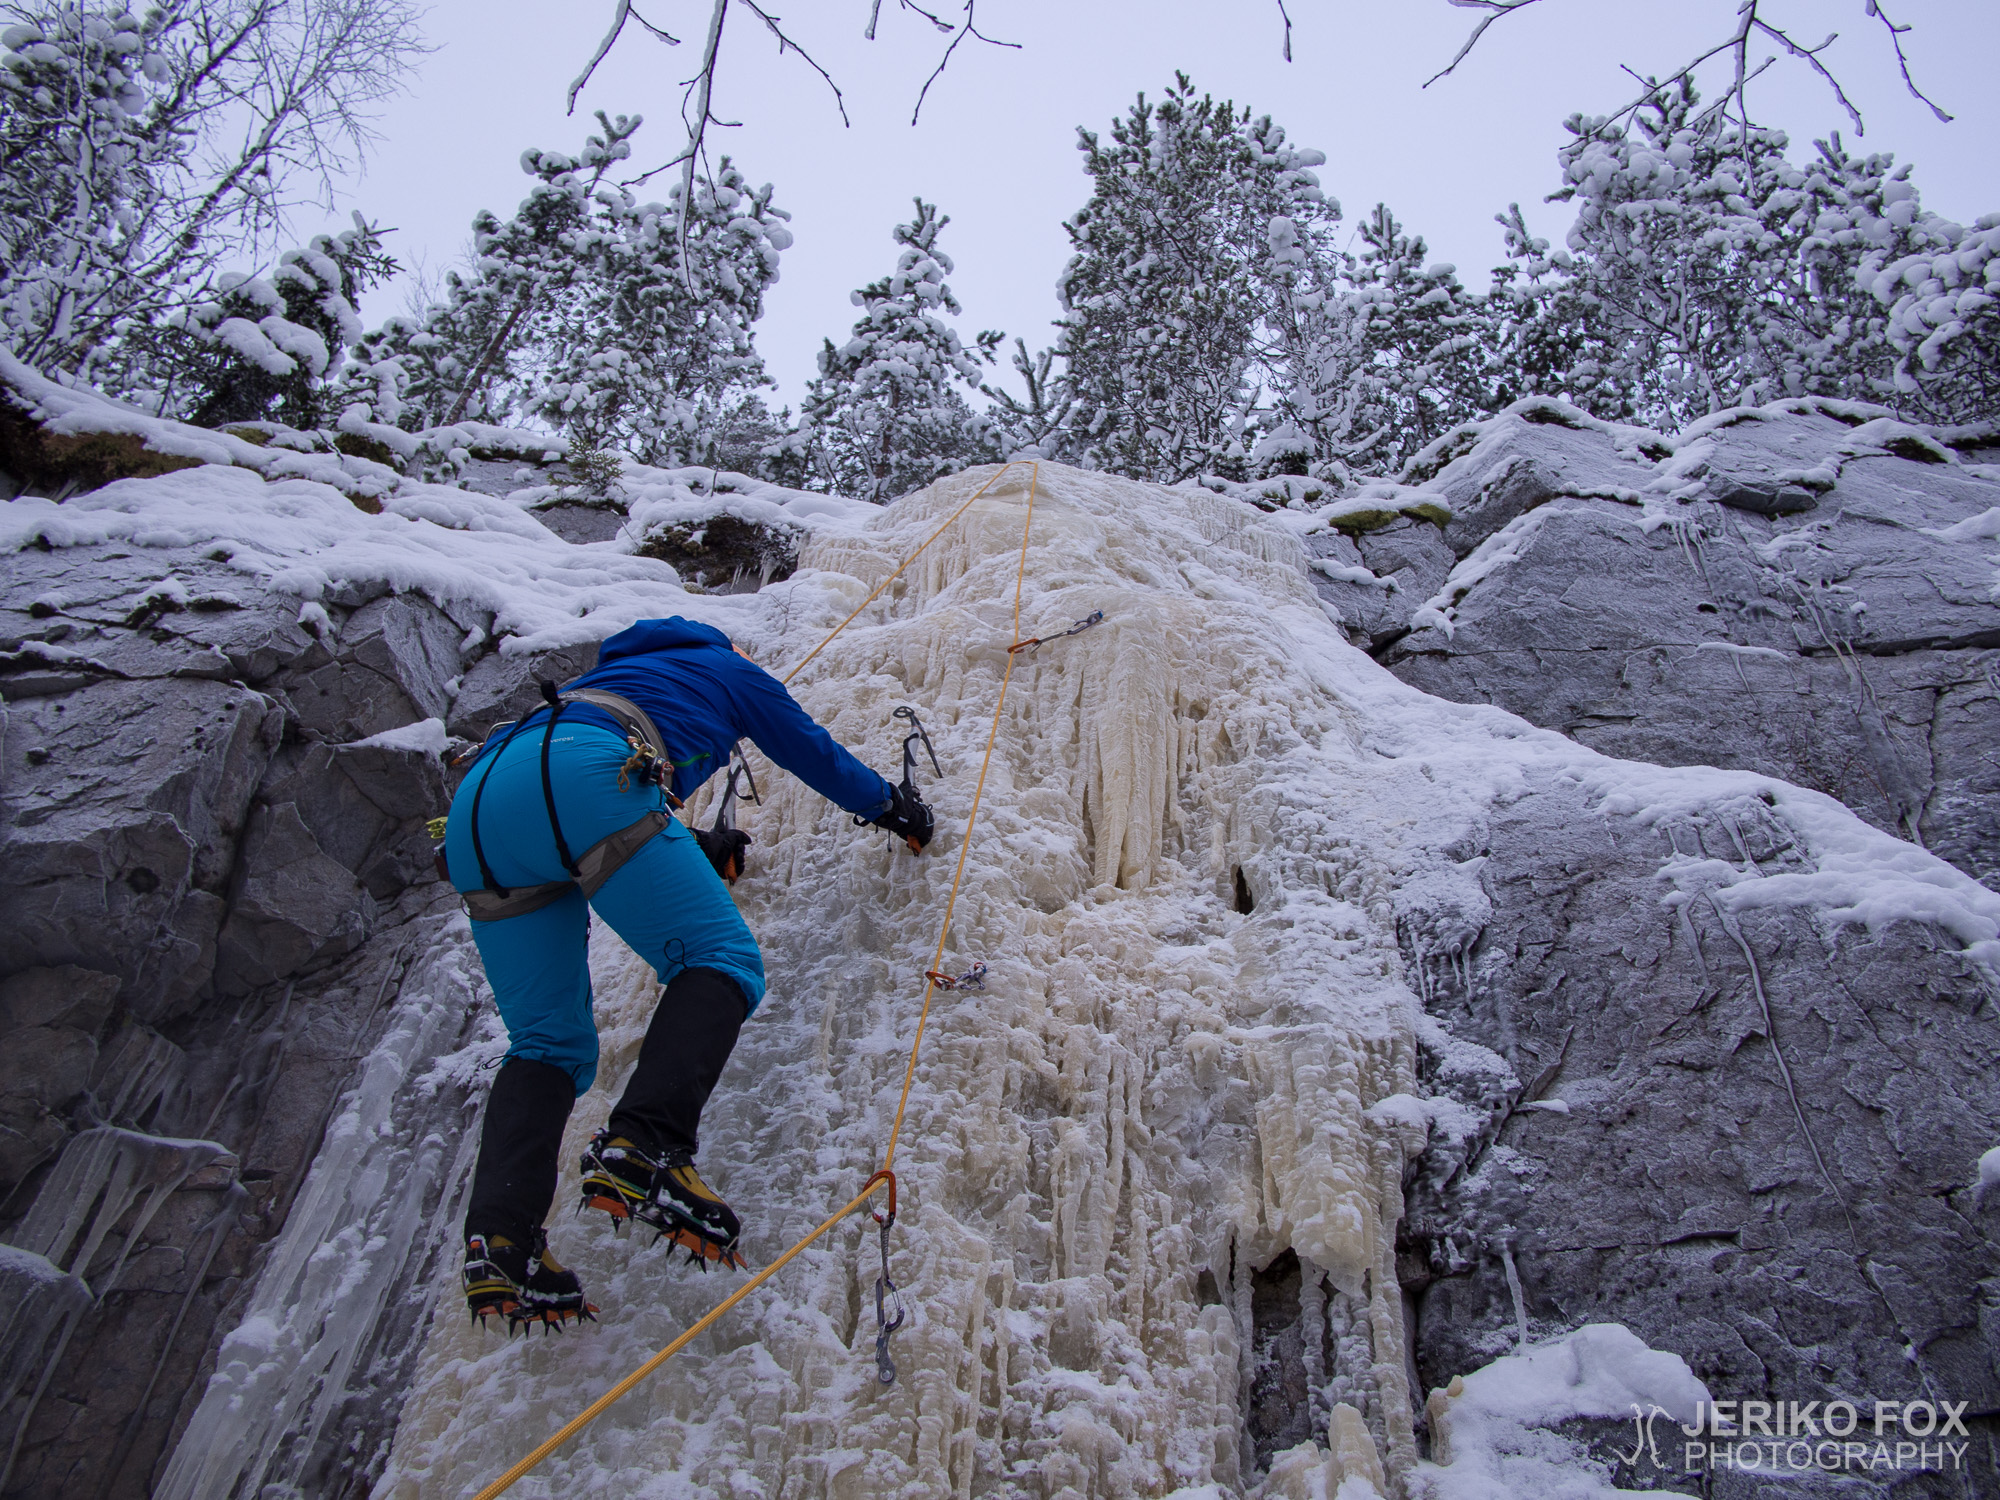
The weather was getting warmer towards the end of January. Me and Dima decided to enjoy the warm day of -5°C (23°F) climbing the icefall in Haminalahti. (How to get there in previous post.) Ice was getting a bit softer than it was before and thus it took less effort to use the ice tools and crampons. Leading felt still quite intimidating, but I seem to have every time a wee bit more trust on my climbing skills.

Location: 62°50’58.8″ N, 27°32’11.4″ E
Dima’s photos

Keli lämpeni tammikuun loppua kohden ja lähdimme Diman kanssa nauttimaan lämpimästä -5°C säästä Haminalahden jääputoukselle. (Reittiohjeet aiemmassa blogitekstissä.) Jää alkoi jo olla hieman pehmeämpää, joten hakut ja raudat purivat selkeästi paremmin kuin aiemmin. Liidaaminen oli yhä aika jännittävää, mutta luottamus omaan kiipeämiseen tuntuu paranevan joka kerta.

Sijainti: 62°50’58.8″ N, 27°32’11.4″ E
Diman kuvat

First Steps of Lead Climbing on Ice

In mid January me and Dima had finally chance to scale our “local ice fall” in Haminalahti. The temperature had dropped to inviting -28°C (-18°F) and I had to put on so many layers of clothing that I was hardly able to fit into my harness. And so did the two determined Michelin men wobble to the bottom of the ice fall.

Haminalahti ice fall forms on the right hand side of the Haminalahti 1 rock climbing sector. To get there you should take E63 and head south from Kuopio. At the intersection of ABC Pitkälahti you turn towards Karttula. You follow Karttulantie a little less than 5 km  (3 miles), until you come to the crossroads of Länsirannantie (that leads to the actual village of Haminalahti). There is enough space to park couple cars near the crossroads without blocking the way.

We had climbed this ice fall last winter with a top rope. What we learned was that wading balls deep in snow to the top of the ice fall can easily take an hour. That’s why we were more than willing to learn to lead up the ice fall, which would take us straight up to the top anchor. And we would avoid trudging trough the snow. We had been placing ice screws while standing on a flat ground, but it’s a whole different game while climbing. While you place the screw you must be able to hang on the ice with only one ice tool and crampons. Especially when it was so cold and the ice was hard as a rock this was more easily said than done.

We proceeded with the small ice fall in very patient manner: the leader climbs a bit, then he places an ice screw, clips the rope, comes down and then switches places with the belayer who places the next screw. Even though falling is part of climbing, in ice climbing the leader should NOT fall. Ice screws and ice are never as solid as rock climbing protection and rock. You might get hit with an occasional stone while rock climbing, but in ice climbing it is actually possible to get the whole icicle to fall on you (this is how it looks to face the worst nightmare of every ice climber). That means several tons of ice even in the best case scenario. Also you might get hit by your own ice tools and crampons or get them jammed and snap a limb. In addition everything that hits the ground might hit the belayer, which isn’t a good thing for the climber either. So, I think it’s now obvious why we didn’t really feel the need to try what happens when you get pumped beyond the point of being able to place an ice screw.

The first experience of leading on ice – even on an ice fall as small as this – was pretty scary. I’m not the most fearless climber to begin with and while placing an ice screw I grew disturbingly aware of the fall. And when you start to panic, you squeeze the ice tool like your dear life which drains all the power in an instant. To be a better leader seems to take some static strength (to be able to hold the position while screwing) and some mental desensitization. It’s obvious that leading on ice must be done in an ice fall that’s grade is on your comfort zone.

Even though I might have been frozen solid (mostly for the fear, not so much for the weather), by the end of the day I was really feeling like a winner. First steps of leading on ice are done. The next thing on the list is to be able to lead the whole line from the bottom to the top.

Location: 62°50’58.8″ N, 27°32’11.4″ E
Dima’s photos

Tammikuun puolivälissä pääsimme Diman kanssa viimein korkkaamaan “kotiputouksemme” Haminalahdessa. Pakkasta oli mukavat -28°C, joten puin niin paljon vaatekerroksia, etteivät valjaat meinanneet enää mahtua päälle. Tästä huolimatta vaapuimme päättäväisesti kuin kaksi Michelin-mania jääputouksen juurelle.

Haminalahden jääputous muotoutuu Haminalahti 1 -kalliokiipeilysektorien oikealle puolelle. Paikanpäälle löytää ajamalla Kuopiosta moottoritietä etelään ja kääntymällä ABC Pitkälahden liittymästä kohti Karttulaa. Karttulantietä ajetaan vajaa 5 km, kunnes tullaan Länsirannantien risteykseen (joka vie itse Haminalahden kylään). Pari autoa mahtuu parkkiin Karttulantien ja Länsirannantien risteyksen levikkeelle olematta liikenteen tukkona.

Olimme kiivenneet Haminalahden puikkoa viime talvena yläköydellä ja todenneet yläankkuripaikan lähestymisen munia myöten hangessa kahlaten vievän helposti tunnin. Niinpä tavoitteena oli nyt opetella liidaamaan eli alaköysikiipeilemään jäätä, jolloin voisimme nousta yläankkuripaikalle suoraan kiipeämällä lumessa tarpomisen sijaan. Olimme harjoitelleet jääruuvin asettamista tasamaalla, mutta kiivetessä se on huomattavasti haastavampaa. Ruuvaamisen ajan on pystyttävä roikkumaan jääseinämällä yhden jäähakun ja jäärautojen varassa. Näin kovalla pakkasella jään ollessa panssarimaista tämä on tietysti helpommin sanottu kuin tehty.

Etenimme pientä puikkoa hyvin maltillisesti: liidaaja kiipesi lyhyen pätkän, asetti ruuvin, klippasi köyden, laskeutui alas ja varmistaja siirtyi kiipeämään seuraavan ruuvinvälin eteenpäin. Vaikka putoamisen aina sanotaankin kuuluvan kiipeilyyn, on jääkiipeilyssä nyrkkisääntönä, että liidaaja EI saa tippua. Jääruuvien ja jään kestävyys ei ole koskaan yhtä pomminvarmaa kuin kallion ja kalliovarmistusten. Kalliosta saattaa toki irrota kiviä, mutta jääkiipeillessä on mahdollista saada päällensä koko puikko (jääkiipeilijän pahin painajainen näyttää tältä) eli parhaimmissakin tapauksessa useita tonneja jäätä. Myös jääraudat ja hakut voivat aiheuttaa lisävammoja jättämällä raajan jumiin tai osumalla kiipeilijään. Lisäksi kaikki maahan asti putoava materia uhkaa myös varmistajaa ja sitä kautta kiipeilijää. Näin ollen meillä ei ollut tarvetta kokeilla miten uuvuksissa pystyy vielä asettamaan jääruuvin.

Ensimmäiset kokemukset jään liidaamisesta – näinkin pienellä putouksella – olivat aika pelottavia. En ole muutenkaan maailman kovapäisin liidaaja, joten jääruuvia asettaessa huomasi olevansa häiritsevän tietoinen siitä millaiset pannut ovat edessä, jos homma ei onnistu. Lisäksi jännittäessä alkaa puristaa jäähakkua tarpeettoman kovaa ja sillä saakin itsensä yllättävän nopeasti voimattomaksi. Liidaamisessa kehittymisen eväiksi tarvitaan siis staattista voimaa, että jaksaa pitää asennon ruuvaamisen ajan sekä henkistä siedätyshoitoa. Ilmiselvää on se, että jään liidaamista täytyy tehdä putouksella, jonka vaikeusaste on selvästi omalla mukavuusalueella.

Vaikka päivän aikana tulikin oltua välillä kauhusta kankeana oli lopuksi kuitenkin jäljellä melkoinen voittajafiilis. Ensimmäiset askeleet jään liidaamisessa on otettu, vaikka mitään sankaritekoja ei tullutkaan tehtyä. Seuraavana etappina onkin sitten kokonaisen linjan liidaaminen yksin.

Sijainti: 62°50’58.8″ N, 27°32’11.4″ E
Diman kuvat